In this article, we’ll explain the kusanagi bcache command, which is designed to improve page load speed and reduce server load. One of its key features is that it leverages WordPress’s built-in caching mechanism and stores cache data in the database. Since it runs on PHP, it allows for fine-grained control over caching behavior. We’ll also cover how to enable/disable bcache, clear the cache, and configure cache expiration times and query string rules.
This article is a follow-up to our previous explanation of the kusanagi fcache command.
Like fcache, bcache stores already-rendered pages and reuses them for identical requests to improve response speed and reduce server resource consumption. However, unlike fcache, which runs on Nginx, bcache utilizes WordPress’s native caching system and operates via PHP. While this means it may not match fcache in terms of raw speed or CPU efficiency, it does offer more flexibility and control through PHP logic.
As mentioned, bcache uses WordPress’s built-in caching system, but unlike typical WordPress caching plugins, bcache stores its cached data in the database. This is one of its most distinctive features.
KUSANAGI Commands Related to bcache
Checking the bcache Status
To check whether bcache is enabled for a specific profile, use:
Like the fcache command, you can specify a profile name as an optional parameter. If omitted, the current profile will be used by default.
# kusanagi bcache status [profile]
bcache is off.
bcache completed.
Enabling bcache
To enable bcache for a specific profile, run:
# kusanagi bcache on [profile]
Turning bcache on.
bcache completed.
Disabling bcache
To disable bcache for a specific profile, run:
# kusanagi bcache off [profile]
Turning bcache off.
bcache completed.
Clearing bcache Cache Data
To clear bcache cache data for a specific profile, use:
# kusanagi bcache clear [--path] [profile]
Clearing bcache.
truncate table `wp_site_cache`
bcache completed.
In addition to specifying a profile, you can use the –path option to target the cache for a specific URL.
⚠️ Note: If you’re running this command on a site with many pages, clearing cache may place a significant load on the database.
Configuring bcache
Since bcache runs on PHP, it offers fine-grained control over caching behavior. These settings can be adjusted from the “Page Cache” tab under the KUSANAGI menu in the WordPress admin dashboard.
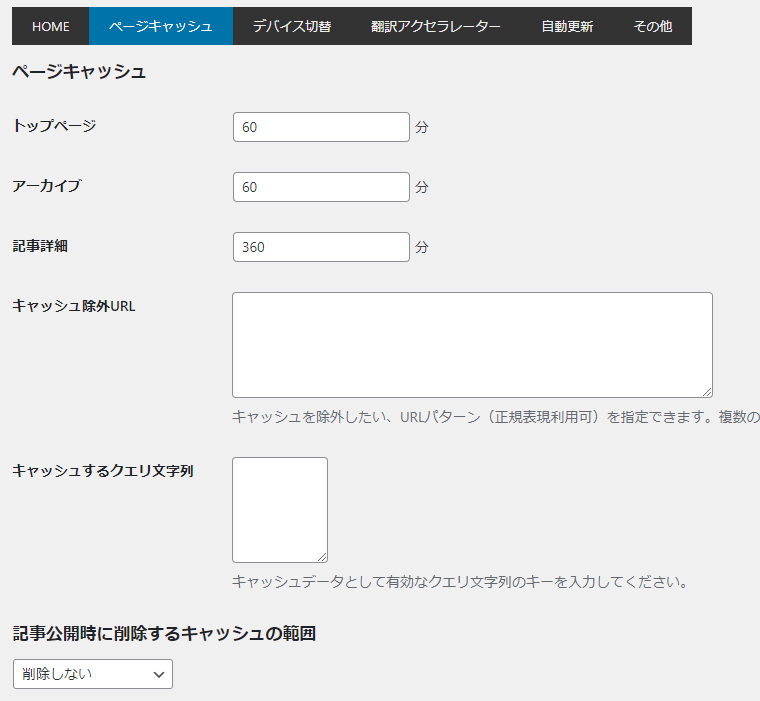
Cache Expiration Time
You can set different cache lifetimes for the front page, archive pages (such as categories or tags), and individual posts.
By default:
- Front page and archive pages: 60 minutes
- Individual posts: 360 minutes
Reducing the cache duration allows updated content to appear sooner, but it also increases server load. Adjust these settings based on your update frequency, performance needs, and the cache-clearing behavior described below in “Cache Clearing on Post Publish.”
Excluding URLs from Cache
In some cases, certain pages or URLs require real-time updates and should not be cached. To exclude such pages, add their paths to the “Exclude URLs from Cache” setting.
Query Strings to Include in Cache Keys
By default, bcache ignores query strings when determining whether to serve a cached page. This avoids bloating the cache and keeps performance high.
However, if your site changes content based on specific query strings, this default behavior could lead to incorrect content being displayed. To handle this, you can specify which query string parameters should be included in the cache key.
Cache Clearing on Post Publish
When publishing a new post, you can configure whether and how the cache should be cleared:
- Do not clear: No cache is removed. Updates may take time to reflect, so consider using shorter cache durations.
- Clear all: Removes all cache data (equivalent to running kusanagi bcache clear). Use this when you want updates to reflect immediately—longer cache lifetimes are generally fine in this case.
- Clear post only / Clear post and front page: These options perform partial cache clearing, similar to using the –path option with kusanagi bcache clear.
⚠️ On large sites with many pages, partial cache clearing may cause high database load, so plan accordingly when configuring these settings.
TIPS
Using a Separate Database for bcache
You can configure bcache to store its cache data in a separate database by defining the following constants in your wp-config.php file:
define(‘CACHE_DB_NAME’, ‘your_cache_db_name’); // Name of the cache database
define(‘CACHE_DB_USER’, ‘your_cache_db_user’); // Username for the cache database
define(‘CACHE_DB_PASSWORD’, ‘your_cache_db_password’); // Password for the cache database
define(‘CACHE_DB_HOST’, ‘your_cache_db_host’); // Hostname of the cache database server
This setup is useful in environments where the database server and the WordPress application server are on different machines.
Because bcache stores full HTML responses—which tend to be relatively large—transferring them across separate servers can introduce network latency, which reduces caching efficiency. By placing the cache database on the same server as the application, you can reduce this overhead and improve performance.
Integration with HTML Replacement Feature
KUSANAGI’s official plugin includes an HTML replacement feature, which allows you to modify URLs in the generated HTML—for example, to use different FQDNs for the admin area or media files.
bcache is designed to work with this feature. When serving cached content, it applies the defined HTML replacements before delivering the response, ensuring compatibility with your site’s customized output requirements.
4.Notes on Using bcache
As mentioned earlier, bcache leverages WordPress’s built-in caching system. Because of this, it is not compatible with other WordPress caching plugins such as WP Super Cache or W3 Total Cache. Do not use them together.
The bcache feature is only available if the KUSANAGI-provided WordPress plugin is installed. This plugin is automatically included when you provision WordPress using KUSANAGI. However, if your WordPress site was migrated from another environment (not provisioned through KUSANAGI), this plugin may not be present.
In that case, provision WordPress once with KUSANAGI, then copy the directory:
wp-content/plugins/mu-plugins
and overwrite the same directory in your migrated site. This will ensure the required plugin is installed.
Placement of wp-config.php
Also note that the kusanagi bcache command only works if wp-config.php is located directly inside or one level above the DocumentRoot directory that was set during provisioning.
If your site was migrated from another system and WordPress is installed in a subdirectory—or if you have multiple WordPress installations in different directories—KUSANAGI’s bcache command may not be able to enable or disable caching through the CLI.
However, even in such cases, the bcache functionality can still be used as long as the KUSANAGI plugin is installed. You can enable or disable caching manually by setting the WP_CACHE constant in wp-config.php.
define(‘WP_CACHE’, true); // to enable
define(‘WP_CACHE’, false); // to disable
Note: Query strings used by WordPress’s default permalink structure—such as p, author, and cat—are included in the cache conditions.