In this article, we’ll cover the kusanagi fcache command.
On the KUSANAGI platform, fcache refers to the FastCGI caching functionality of nginx. FastCGI is a method that allows the server to dynamically generate web pages using languages like PHP. The FastCGI cache stores those generated pages so that future requests can be served with prebuilt content—rather than regenerating the page dynamically each time—dramatically improving performance.
To use fcache, nginx must be installed and running on your environment.
KUSANAGI provides convenient commands to enable or disable fcache, as well as clear cached data when needed.
The performance benefits of using fcache are significant. Compared to a typical LAMP stack, enabling fcache can result in up to 2,330x faster page delivery.
Here’s a simplified illustration of how FastCGI caching works:
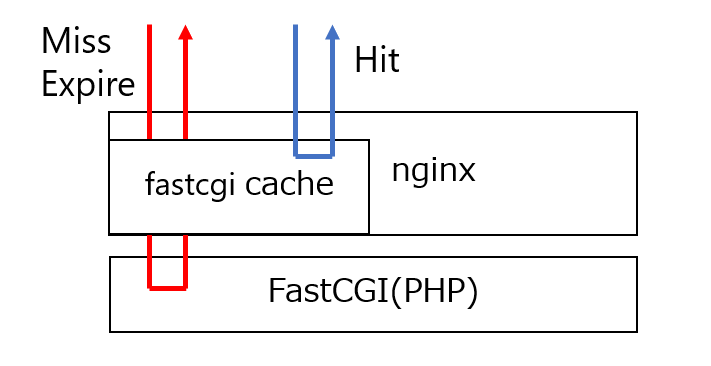
Of course, static content such as images and script files is not cached by fcache.
Also, note that while KUSANAGI includes both nginx and Apache as web servers, the fcache feature is only available with nginx. It does not work with Apache.
In addition to fcache, KUSANAGI also offers other caching mechanisms such as bcache, and more recently, the Theme Accelerator.
If you’re interested in learning more about the Theme Accelerator, we recommend reading our recent tech column on the topic:
Introducing the “Theme Accelerator” in the KUSANAGI Plugin – KUSANAGI Tech Column
Now, let’s walk through what you can do with the kusanagi fcache command—step by step.
Checking the Status of fcache
To check whether fcache is enabled for a specific profile, use the following command:
# kusanagi fcache status (プロファイル名)
fcache is off.
fcache completed.
#
As a general note for KUSANAGI 9:
You can either specify the profile name at the end of the command, or navigate to the target profile directory (e.g., /home/kusanagi/(profile_name)) and run the command from there.
In the example above, fcache is off. confirms that fcache is currently disabled.
If it were enabled, the output would say: fcache is on.
Enabling the fcache
To enable fcache for a specific profile, use the following command:
# kusanagi fcache on (プロファイル名)
Turning fcache on.
reload completed.
fcache completed.
#
This command activates the fcache feature for the specified profile.
Disabling the fcache
To disable fcache for a specific profile, use the following command:
# kusanagi fcache off (プロファイル名)
Turning fcache off.
reload completed.
fcache completed.
#
This command disables the fcache feature for the specified profile.
Clearing Cached Files with fcache
To clear all cached files under a specific profile, use the following command:
# kusanagi fcache clear (プロファイル名)
Clearing fcache.
fcache clear completed.
fcache completed.
#
This clears all cached files under the FQDN configured for the specified profile.
If you want to clear the cache for a specific page rather than the entire FQDN, you can use the –path option:
# kusanagi fcache clear --path /page (プロファイル名)
Clearing fcache.
SUCCESS: smart:GET:http://(FQDN)/page/ cache was deleted.
SUCCESS: pc:GET:http://(FQDN)/page/ cache was deleted.
fcache clear completed.
fcache completed.
#
In this example, the cache for http://(FQDN)/page is deleted.
You can narrow the scope even further by specifying a deeper path, such as:
–path /page/page2
which will delete the cache for http://(FQDN)/page/page2.
That concludes what you can do with the kusanagi fcache command.
Key features of the fcache functionality
The fcache feature in KUSANAGI includes several notable characteristics:
Device-specific caching
As shown in the kusanagi fcache clear example, you may notice prefixes like smart: or pc: in the cache deletion output.
This indicates that fcache automatically separates cache entries based on the User-Agent. It detects whether the request is from a PC, tablet, or smartphone, and stores different cache versions accordingly.
Cache is disabled for certain conditions
fcache does not serve cached pages in the following cases:
- When a POST request is made
- When the URL contains query strings (i.e., parameters following a ?)
- When the user is logged in to WordPress
In these situations, pages are always generated dynamically to ensure accuracy and freshness.
Cache Expiration: 10 Minutes
The default cache lifetime is 10 minutes.
After 10 minutes, the cache is automatically invalidated and removed.
Performance Benefits of Enabling fcache
The benefits of enabling fcache are documented on our official site, kusanagi.tokyo. Here is a summary of the results:
With KUSANAGI 9 on a standard cloud environment, enabling page cache allows the system to handle over 25,000 concurrent requests per second (via HTTP).
Without page caching, the system handles around 210 concurrent requests per second (HTTP/HTTPS).In comparison to a standard LAMP stack, this represents:
- Up to 260x faster performance with page caching
- Around 2x faster performance without page caching
These results clearly demonstrate the remarkable acceleration made possible by using fcache—up to 260x faster than a standard LAMP stack when page cache is enabled.
If you’re looking to maximize performance for your CMS, fcache is a must-have feature in any KUSANAGI 9 environment.
Command References (KUSANAGI 9 Manual)
- fcache status : https://kusanagi.tokyo/en/kusanagi9/document/commands/#fcache_status
- fcache on : https://kusanagi.tokyo/en/kusanagi9/document/commands/#fcache_on
- fcache off :https://kusanagi.tokyo/en/kusanagi9/document/commands/#fcache_off
- fcache clear : https://kusanagi.tokyo/en/kusanagi9/document/commands/#fcache_clear